
DIY Tile and Grout Cleaning Hacks That Actually Work
When it comes to sprucing up your home, nothing ruins the shine faster than dirty tiles and grimy grout. Over time, soap scum, mould, and dirt sneak into the gaps, making your floors look dull no matter how much you clean. However, you do not need an expensive professional clean every time; some tried and tested DIY methods can work wonders.
This blog will provide you with a few DIY tile and grout cleaning hacks that actually work. Whether you are tackling a bathroom, kitchen or entryway, a little know how and the right tools can make cleaning less of a dreaded chore. And if you’re looking for cheap end of lease cleaning Newcastle, these methods could help you save some of your bond money while leaving your home spotless.
Hide
Show
- Preparing Tiles and Grout for Deep Cleaning
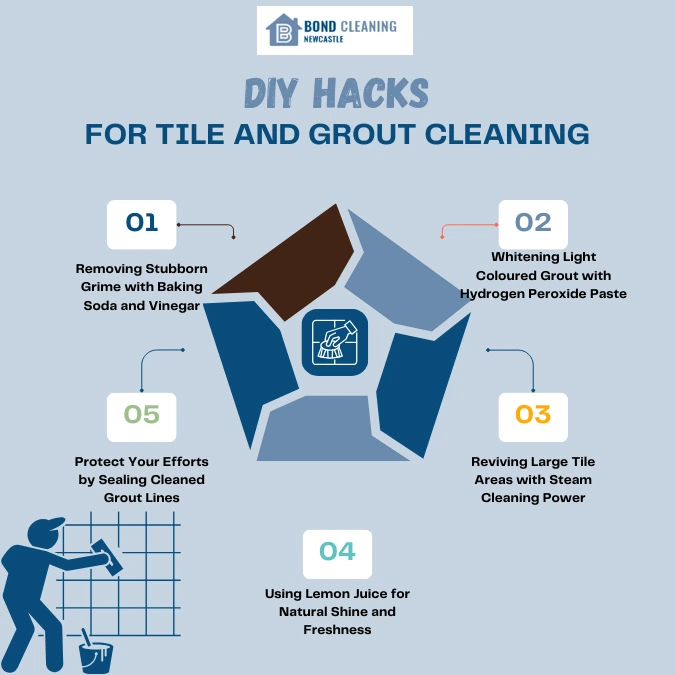
- Removing Stubborn Grime with Baking Soda and Vinegar
- Whitening Light Coloured Grout with Hydrogen Peroxide Paste
- Reviving Large Tile Areas with Steam Cleaning Power
- Using Lemon Juice for Natural Shine and Freshness
- Protect Your Efforts by Sealing Cleaned Grout Lines
- Infographics on DIY hacks for tile and grout cleaning
- Wrapping Up
1. Preparing Tiles and Grout for Deep Cleaning
Before you begin deep cleaning, you need to prepare your tiles and grout. Begin by sweeping or vacuuming the area to eliminate any loose dirt and dust. This keeps debris from becoming a muddy mess when combined with cleaning products. A microfibre dust mop is ideal for floors while a handheld vacuum can easily handle wall tiles.
To remove surface level grime from extremely contaminated areas, quickly clean the tiles with a moist cloth. This initial step ensures that your cleaning solution can penetrate deeper into the grout lines without being obstructed. Consider it a primer coat before painting, as it provides the framework for the final transformation. A brief wash with warm, soapy water can also help to release oil particularly in kitchens where food splatters are common.
2. Removing Stubborn Grime with Baking Soda and Vinegar
One of the most successful DIY grout cleaning techniques is the proven baking soda and vinegar method. Begin by generously spreading baking soda over the grout lines. Then, spray some white vinegar on top. You will see the mixture fizz; that is the reaction breaking down dirt and grease.
Allow the solution to sit for 5 to 10 minutes before scrubbing with a hard bristles brush or an old toothbrush. After you’ve massaged it into the grout, rinse with warm water. This eco friendly approach not only removes stains but also eliminates odours, making it ideal for kitchens and bathrooms. For an extra thorough clean, use a microfibre cloth to remove any remaining residue.
3. Whitening Light Coloured Grout with Hydrogen Peroxide Paste
Hydrogen peroxide is a game changer for removing persistent stains and mould from grout. Make a paste using equal parts hydrogen peroxide and baking soda then spread it over the grout lines. The peroxide’s oxidising powers aid in the removal of deeply embedded dirt, while also sanitising the area.
Let the mixture sit for at least 15 minutes before scrubbing. Rinse the tiles with warm water and dry them thoroughly for an extra shine. This procedure is especially useful for light colored grout which highlights every trace of dirt. Always wear gloves to protect your skin and do not use this method on coloured grout because it may lighten with time.
4. Reviving Large Tile Areas with Steam Cleaning Power
If you want a powerful yet chemical free cleaning method, steam cleaning is worth considering. A steam cleaner blasts high temperature steam into the grout, loosening dirt, killing bacteria, and even reducing mould spores. It is especially effective on large tiled surfaces, saving you hours of laborious scrubbing.
While a steam cleaner might require a small investment or rental fee, it is well worth it for end of lease cleaning Newcastle when you need to make the tiles look brand new. Always use the appropriate brush attachment for grout lines to avoid damaging the tiles. Furthermore, the steam’s heat allows you to clean and disinfect at the same time which makes it an ideal all in one option.
5. Using Lemon Juice for Natural Shine and Freshness
For a quick, natural whitening boost, lemon juice works wonders. It is natural acidity helps dissolve soap scum and mineral deposits while leaving a fresh, citrusy scent. Squeeze lemon juice straight onto the grout lines, allow it to remain for 10 minutes then scrape with a brush.
Lemon juice is very useful for little touch ups when you don’t have time for a thorough cleaning. It is not as powerful as baking soda and peroxide for difficult stains, but it is perfect for regular maintenance to keep your grout looking good. You may also mix it with a teaspoon of salt to form a mild abrasive paste for extra scrubbing power.
6. Protect Your Efforts by Sealing Cleaned Grout Lines
After spending time cleaning the grout, sealing it helps keep it cleaner for longer. A grout sealer creates a barrier that prevents moisture, debris and stains from entering. Apply it as directed by the product typically using a small brush or applicator bottle.
Sealing once or twice a year not only lowers the need for thorough scrubbing, but it also extends the life of your grout. Sealing is an excellent way to keep a rental property looking freshly cleaned until your end of lease cleaning Newcastle inspection. To avoid trapping moisture, always ensure that the grout is totally dry before sealing.
Infographics on DIY hacks for tile and grout cleaning
Wrapping Up
Tiles can be the focal point of a home’s design, but only if they are clean and well maintained. These DIY tile and grout cleaning tips will allow you to obtain professional level results without breaking the bank. If you’re moving out, remember that clean tiles and grout might make a big difference in getting your bond back. Once you know these tricks, you’ll never look at tile cleaning the same way again.